Week 9
Week 9 is finally here. It's crunch time. Our group has been rolling on through from the progress we made last week. Shots are really coming together nicely. Most shots with 3d assets composited into them have been at least been produced as a rough comp with a few being final minus being color corrected to a master shot. The end is near!
The video above is shot 6. The shot is a simple rough cut showing the animation of the cube and timing of the "poof" of the cube. The poof will most likely be slowed down a bit in a future version. Image based lighting will also be added. The lighting might need to be fixed as the cube is a bit more illuminated on the right side, which I would think in theory would be a bit darker if not the same brightness due to the proximity of it in relationship to the wall. Either way, the shot is animated and lit for the most part with render passes and a nuke file already set up.
This shot is the very next shot in the sequence. This shot as of now is final other than matching with a master shot, which will be one of our next steps in the next few days. The shadows were edited quite a bit so that they would blend in with the existing shadows as opposed to getting darker, as seen in the rough cut. Most of this was done in the rough, but I feel some editing in nuke really helped out quite a bit.
The above shot is again, the next shot in the sequence. This shot is not finalized yet, as an occlusion pass needs to be re-rendered. There is a slight line that extends out to the left through the scene due to the edge of a ground plane. It is too low to be roto'd out, as it would impede with the occlusion in the actual ghosts. The plane was actually just expanded so that the edge would be much further away (up, in a 2d image) so that it can be roto'd out. This shot was rendered out in four passes: character, shadow, occlusion, and reflection. Reflection took a bit of figuring out, as my actual shape tab in the maya attribute editor disappeared on me. I could not turn off primary visibility and the option to do so in the pass attributes didn't do anything. Ultimately, I was able to re-add my shape attribute tab to the editor and it was cake from there.
We have also talked about the possibility of adding cubes in the above shot as the actor is running, like pac-man would do. It would be based on a time factor, as we want to make sure we hammer out any issues and renders that are NECESSARY in our project first. In my opinion, we are making great progress and I feel very fortunate to be working with both Kev and Melissa. I think our group has been on the ball since the beginning of the project and we're all pretty pleased with the work we've churned out so far.
Week 8
For week 8, the group continued to progress on our final. Last week Kev and Melissa had both gone on with camera matching and playing around with 3D tracking for our single 3D tracking shot. I had continued to model and play around with some different ideas for ghosts.
For this week, I was able to finalize the ghost's nCloth as you will see in a video I will be posting hopefully soon as it's currently rendering (should be up before class tomorrow). I also completed both of my camera matches and lit them, as seen below. I had a bit of trouble getting one of our camera shots aligned perfectly, as I believe our camera settings were a bit off. It looked a bit distorted. After some time spent playing around, I finally got it to look correct, as well as seem correct spatially in the scene itself.

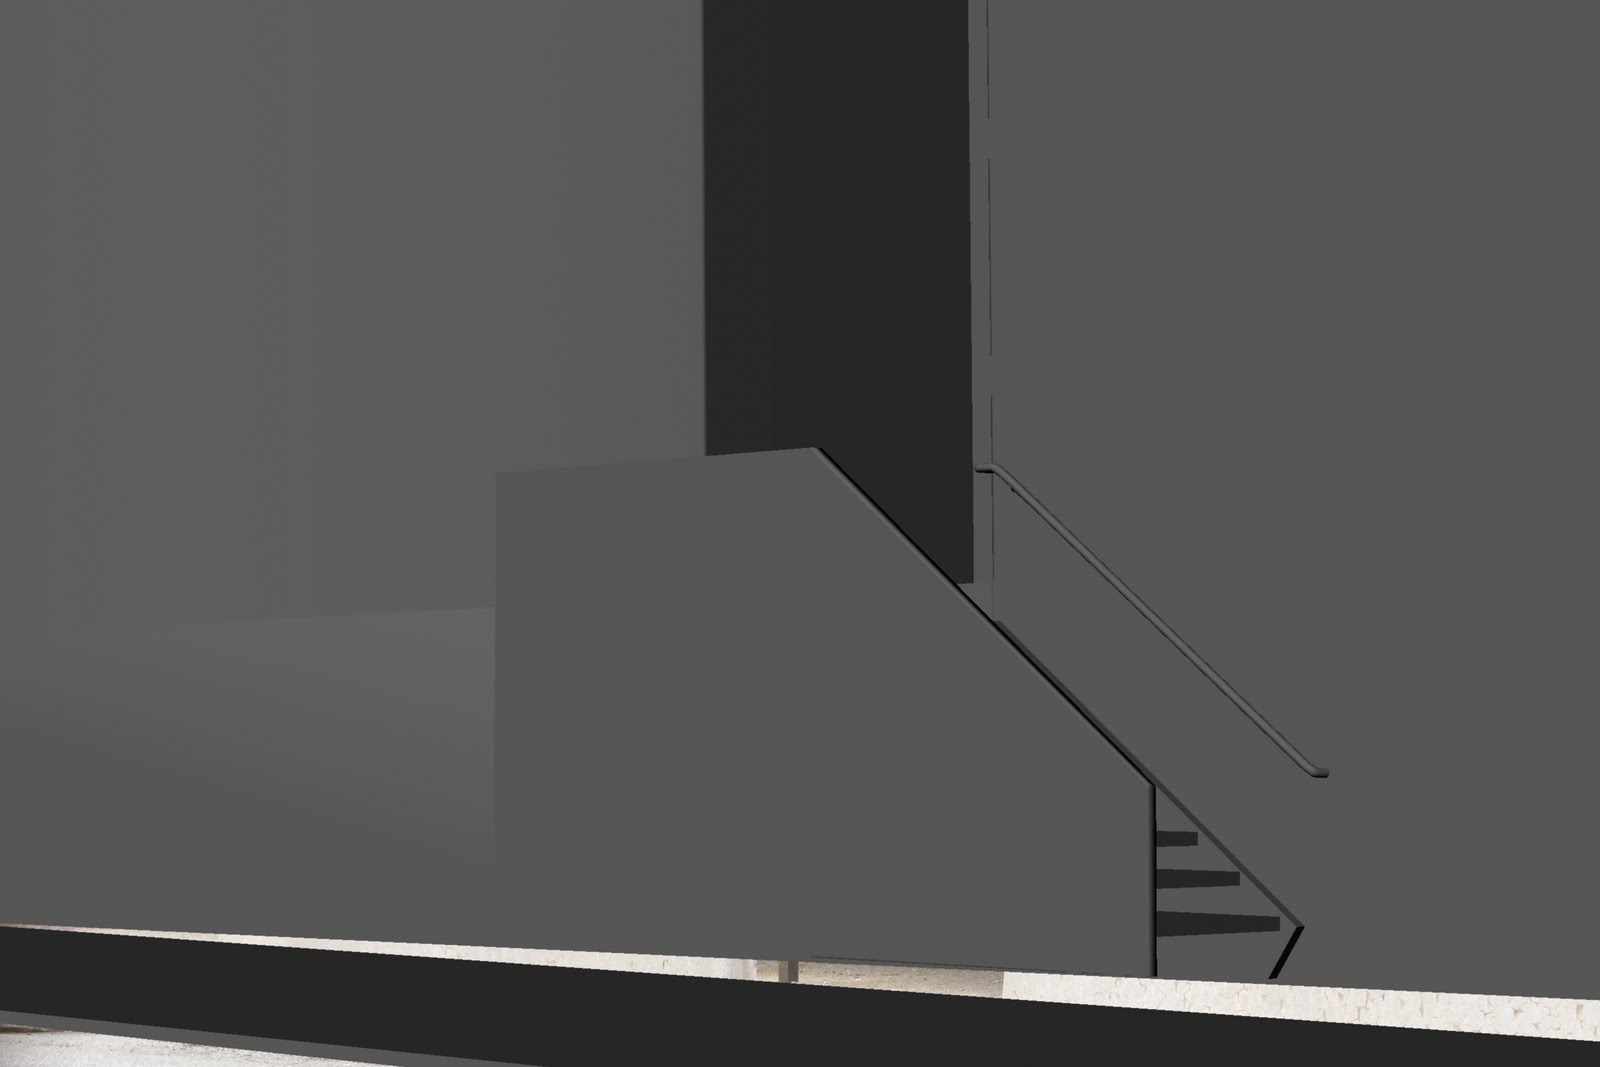
For the shot above, I went ahead and actually tried to model the roughness of the corner of the end wall. The wall is made of a weird, rough concrete like material that is really jagged. The tree and trashcan were thrown in on my left just in case the ghost's shadows reached that far, which I know now that they do not and fall just short. The bars at the corner of the wall were there for visibility purposes when the ghosts come around the corner. This shot is fully animated and is currently rendering. When the render is up, I will post a rough composite together for class purposes.

For this shot, no shadow is cast upon the wall, which helped and made it a bit easier as I did not have to model anything other than the windows and window panes. Reflections are seen in the window as the actor passes by, and the same will be done with the ghosts. I am still playing around with making the reflections look okay. This shot was a bit hard to match as the perspective is at a weird sort of angle. The camera was also in the road, which is slightly arced. It made it tough to align properly. This will be animated within the next few days.
We have also been using several ideas from this class assignment into another final of ours. I took camera matching into our storytelling final to help make my shots look better visually. I thought it was worth noting that concepts used in compositing can be used in anything really containing CGI work with still images as well.
Below is a quick render thrown together from a mistake I made. Truthfully, I thought it just looked funny and wanted to post it. Moved the wrong piece animating and nCloth goes crazy!
Again, the first shot (or the attempted one above!) is currently rendering multiple passes. I have a ghost pass, shadow pass, and occlusion pass. This is the first project I've really dealt with occlusion and it's been a pretty cool addition to some of our work we've been doing. Unfortunately, render times are blown up completely. However, it looks insanely cool. Again, I'll be posting a rough composite together as soon as this next pass and a half are done rendering.
Seen above is the rough comp of shot 7 of our final. I forgot to turn off lighting in the character pass, so shadows were not editable in the composite. More or less, I just threw it together to give a sense of what the scene will look like. The animation is down fairly well. Lighting is pretty set also. Timing was estimated based on a .mov and turned out nicely as well. The shadow pass is almost done as well as the occlusion pass and will be composited once a re-render of the character pass is completed (which will be done overnight).
Week 7
This week we have begun to finalize 3d assets and also start on camera matching our shots. I'm pretty excited about what we have done so far and feel that we are on a pretty solid pace in order to give ourselves enough time for compositing and post-production.
In terms of progress for this week, I have created several 3d assets with simple shaders to be used in the scenes. Not shown are the Pacman power up sphere (which is just a simple sphere with a similar shader that the pellet has on it) and the Pong paddle (just a simple rectangle with a white-yellowish shader). Several shots of other assets are seen below:
 |
| Side view of a clay pigeon to be used in our Duck Hunt sequence. A simple orange shader was used as the top section just as I was modeling off of the reference images, but will be changed to white to match the in-game feel. |
 | |
| Top view of the clay pigeon. |
 |
| Pacman Cherries! |
 |
| Pacman power up pellet. This had been previously modeled and textured but the group decided that we would like it to be a simple white-ish color to keep it similar to game graphics. |
 |
| Top view of the same power up pellet. |
I have also done a fair amount of test work on Pacman ghosts. I had the idea to go ahead and mess around with nCloth for the bottoms of the ghosts. I wanted to originally make the ghost all out of nCloth, but found the time was much easier spent after initial tests to only make the bottoms simulated. I played around with quite a bit of stuff that I hadn't tried in Maya before, and ended up using the Component to Component constraints to take a bottom half of a sphere (which is the bottom of the ghost now made of nCloth) to combine it to a non-nCloth mesh that consists of the ghost's body. I had never used this before, and quite honestly had no idea what it did. To my delight, it worked. A test of different motions and speeds are seen in the test video below:
I have also begun working on my first camera matching shot for this final project. My progress on that shot will be posted by midnight tonight.
Week 6
To start week 6, we've begun working on our group finals. The final is a team project where students are to once again create 3d assets and composite them. However, this time, the content will be composited into live footage shot by the students. The direction of creativity for each project was up to the groups. (NOTE: We have already come up with this idea that will be discussed below. Storyboards were done last week to go along with midterms. Just want to post some of this as I did not get a chance to last week. Further progress will be further down.)
My group consists up of Melissa Cell, Kevin Gross, and myself. As a group, we discussed a few ideas that we wanted to pursue. We ended up coming up with an idea that suites our style and is something that we want to pursue heavily.
Our goal for this assignment is to encourage children and young adults to spend less time indoors and more time outside, exercising. Our mission is to capture the attention and imagination of our target audience, while also relaying an important message. By combining classic, iconic video game imagery with live-action footage, we will establish the idea that the outside world is just as, if not more, fun as virtual reality.
Seen below is our animatic that we have come up with based off of our storyboards. We want to incorporate video game elements that will be (or should be) universally recognized to give ourselves a wider target audience. Our talent will interact with these video game elements "in real life", which will portray the message that kids can have just as much fun outdoors as they do with video games.
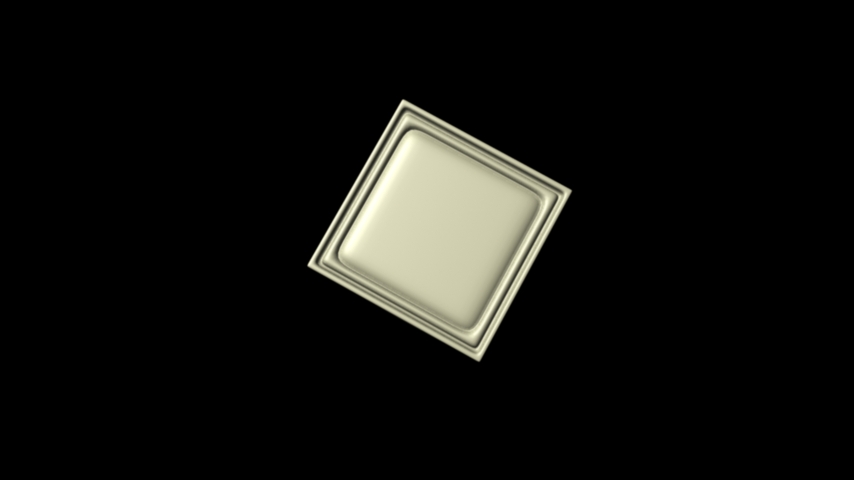
As for progress made this week, we have a camera ready to go for this weekend coming up in order to shoot our footage that will be required for this project. Our talent is available for shooting and we have our locations planned out as well. All three of us have begun creating 3d assets as well. Seen below are a few images of a Pac-man pellet cube that will be "floating" in mid-air for our actor to grab in one of the scenes. The cube is modeled and textured. Bump maps are applied as well, although they need to be adjusted as well as the texture around the circular indents. Also in development are Pac-man ghosts and Pac-man cherries; neither of these are far along enough to be posted with images, but should be by tomorrow.


Week 5
Week 5 is midterms week. Composites are to be done; this means fully animated, composited, and edited into the 2D image. Seen below are the finals of each composite with individual descriptions for each shot.
Also for this week, we were to begin working on our group finals. Finals are group composites using footage shot by the students and do something similar to these midterm shots. My group consisting of Melissa Cell, Kevin Gross, and myself, are going to create a composite similar to a PSA in order to help to try and get kids off their butts, away from the TV screens, and out doors to play. So far, we have managed to figure out who our talent will be (a friend of Kevin Gross is happy to help us out; a quick thanks to him!). We have also done some location scouting and have a pretty decent shot by shot idea of where we want to go to get footage, which we will be shooting hopefully sometime in the next week. We have a storyboard done concerning the flow and look of our composite as well.
Composite 1
Composite 1 turned out fairly well. I had several issues with shadows not rendering correctly to match the actual ball render pass. Lighting was a bit tricky, as it was relatively overcast the day of shooting. Dynamics were used to create the ball deflecting off of the walls. The walls, steps, & rail were made as passive rigid bodies, and the ball an active rigid body. A gravity field applied to the ball with a simple initial start velocity took care of the rest.
Composite 2
Composite 2 also turned out okay. The animations could have been a bit better, but lighting turned out well as there were multiple tube lights above every isle of the library. There was also natural light coming in from practically all directions in the location that I was able to shoot straight on from and still have a bit of distance. Texturing work came out pretty nice as well.
Composite 3
Composite 3 was created using nCloth to make the Phillies banner. The lighting was again, like composite 1, mostly overcast and became a bit tricky. The original goal was to have the banner flip over from behind the rail, but due to complications with other renders, the nCloth simulation just became to long to accomplish in order to get the assignment done on time. I will most likely go back and adjust it at a later date.
Week 4
For week 4, we were to continue our progress on developing assets and compositing them into our scenes. I was able to fully develop my 3d assets and texture them, with one exception, as I had issues when using dynamics and will have to re-texture it later. But for now, here are the following shots.
Image 1

In this shot, I was able to composite the ball into the scene. However, scale will need to be addressed. Also, the shadows are currently not coming up, and will also be worked on within the next day or two. Shadows are casted upon the ball though, and additional lighting will be required to help fix that. The layers work correctly, as you can see the ball is behind the railing. The ball also dips down behind the cement barrier at the bottom of the steps, as well as appearing to come out of the doorway at the start of the animation. The animation is completely done, and the above adjustments need to be made. This shot is the furthest along.
Image 2

There has not been much progress done on this shot. Books have been modeled and textured; some time was put in on texturing these books to make them look realistic. This render just shows the books in on the shelves themselves. Some additional work on textures may be done, but for the most part are finalized. Lighting will be added and animation will be done as well. Animation should be fairly easy, as it will just be keyed. Dynamics will not be needed.
Image 3

In this shot, the lighting was not set up properly, as shadows were cast into the inside of the balcony. This will be addressed, but for the time being, the banner is imported into the scene. Clipping also occurs in the flag where the metal railing is, and will be fixed as well. nCloth simulation may be something I will need additional help with in order to avoid clipping issues.
Week 3
For week 3, we were required to continue working on our first compositing assignment. Students were asked to create their 3d assets to be used in each image that we had taken last week. These assets were only 3d objects that were going to receive cast shadows or allow our 3d elements to use necessary physics within the scene.
Image 1
For image 1, simple geometry is used for the base walls, as well as the doorway from where the ball will originate from. Additional geometry was used to create the elevated platform that is behind the solid side rail, and steps lead down to the sidewalk from said platform. A tube was used for the single railing along the wall. A full plane of geometry was used for the outer railing to give me the ability to use physics for the ball bouncing around down the steps. Visibility of the ball through the individual "spokes" of the real railing will be masked out within Nuke.
Image 2

For image 2, shelves were placed into the scene, as well as a few individual books to be used for cast shadows as the actual "3d" books fall off of the shelves. Shelves may need to be moved back and slightly adjusted. Dividers between shelves will most likely not be needed for shadows, but may be needed in the end. More book placeholders may be needed as well to receive shadows based on how the 3d books fall.
Image 3

For image 3, once again simple geometry makes up the base wall at the bottom leading up to the metal banister. The banister is made up of a simple plain with offsetting edge loops. A plane further back makes up the wall in which the door is embedded. A simple transparent shader was thrown onto the glass planes just to show what it possibly may look like, although further work will be done on them. Based on how high the banner flips over, a shadow may fall down on the bottom where the gate would be below the doors.
Week 1 & 2
For week 1 in Digital Compositing, we were given our first assignment, which is more or less a composite of a 3d element into a real 2d image. Images are to be taken by the student and paired along with some sort of pre-visualization of what the final product may look like.Image 1

Image 1 is an image with a simple doorway and steps leading down to the sidewalk. My hope is to have a ball of some sort, possibly a soccer ball, bounce from what would seem in the doorway, out towards the street. The ball will bounce against the inner wall, and then down to the steps, rolling down the steps and then down out of sight. Notes and Pre-Vis are below.

- Camera is approximately 45 ft. away from the steps
- Camera is set up at about a 35 degree angle from the doorway
- Direct light is behind the building, which shouldn’t be an issue
- Indirect light may be needed
- Steps are 8 inches apart from one another; stairway is 4.5 ft wide
- Doorway is 12 ft high x 8 ft wide; platform is 7 ft high; bottom rail is 3 ft high
Image 2

Image 2 is an indoors shot of a bookshelf. My intent is to bring in several 3d books and place them among the shelves. The books will tip off of the shelves at possible different speeds and/or times. Notes and Pre-Vis are seen below.

- Camera is set up about 4.5 ft away from the shelf
- The framed shelf is about 3.25 ft high by 4.75 ft wide
- There is direct lighting above the shelf in the form of a fluorescent tube light
- Indirect lighting comes from behind the camera via sunlight from the forum
Image 3

Image 3 is an outdoors shot of a local building with a metal rail on their porch. I would like to have a banner flip over the side with possible confetti shooting out along with it as if it were going on during a celebration of some sort. Notes and Pre-Vis are below.

- The camera is across the street, approximately 38 ft away
- The sky was overcast, so there will not be any harsh lighting from the sun
- One problem may be the umbrella and/or wires. Umbrella may have to be created digitally as well as wires to allow wind to affect that as well